How to Build a Kitchen Island with Sink and Dishwasher: A Step-by-Step Guide

A kitchen island with a built-in sink and dishwasher is a fantastic way to add functionality and storage space to your kitchen. It becomes a multi-purpose workstation ideal for prepping, cooking, cleaning, and even dining. Building one, however, requires careful planning and construction. In this guide, we’ll take you through each step, from planning to installation, and discuss essential considerations like plumbing, electrical requirements, and material choices. This guide will also include cost estimates and best practices for integrating appliances seamlessly.
Step 1: Planning Your Kitchen Island: Layout and Dimensions
Before diving into the construction, it’s crucial to finalize your design. The size, shape, and placement will dictate not just how your island looks, but also how it functions.
- Standard Dimensions:
- Height: 36 inches (counter height); 42 inches for bar-height seating.
- Width: At least 24 inches for a single cabinet setup; 48 inches for a more spacious island.
- Length: Minimum of 5 feet to accommodate both a sink and a dishwasher comfortably.
- Clearance Space: Ensure at least 42 inches of clearance around the island to allow easy movement and access to appliances and cabinets.
Layout Considerations:
- Placement: Position the island close to the primary sink or cooking area to maintain a logical work triangle.
- Seating Options: If you plan to include a seating area, allocate a 12-18 inch overhang for knee space.
Step 2: Choosing the Right Materials and Appliances
Your choice of materials and appliances will determine both the aesthetics and longevity of the island.
Countertop Options:
- Quartz: Durable, low-maintenance, and available in a wide range of colors.
- Granite: Elegant and heat-resistant, though it requires sealing.
- Butcher Block: Warm and inviting, ideal for a farmhouse look but needs regular upkeep.
| Material | Cost per Sq. Ft. | Pros | Cons |
| Quartz | $50 – $150 | Non-porous, durable, low maintenance | High cost |
| Granite | $40 – $100 | Natural look, heat-resistant | Needs sealing |
| Butcher Block | $20 – $60 | Warm, ideal for chopping/prepping | Prone to scratches and stains |
Sink and Dishwasher Options:
- Choose a stainless steel or fireclay sink for durability.
- For dishwashers, look for energy-efficient models with a noise level under 44 dB for quiet operation.
Step 3: Structural Considerations and Frame Construction
Your kitchen island needs a solid frame to support the weight of the countertop and appliances.
- Build a Base: Use 2×4 lumber to construct the frame. Make sure to account for the weight of heavy countertops like granite or quartz.
- Add Cabinets and Support: Choose pre-built cabinets or custom-built ones for storage underneath. Include reinforced plywood panels for additional support.
- Waterproofing: Use moisture-resistant plywood for areas near the sink to prevent rot.
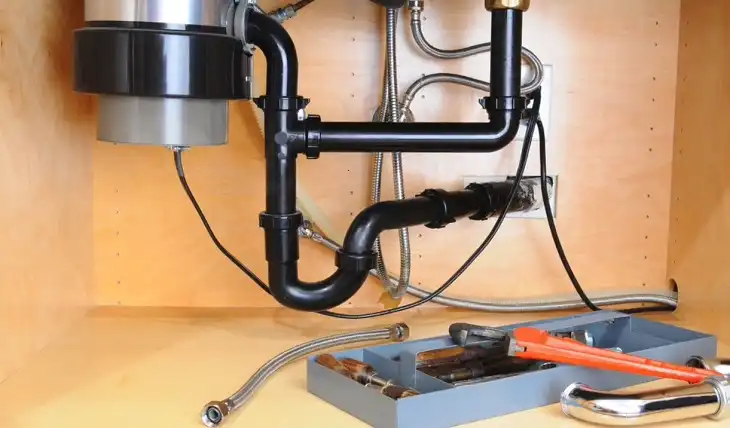
Step 4: Plumbing and Electrical Requirements
Since your island will have both a sink and a dishwasher, proper plumbing and electrical setup is critical.
- Plumbing:
- Install a P-trap and connect it to the main drain line.
- Use flexible PVC piping for ease of installation and durability.
- Electrical:
- Ensure your island has at least two electrical outlets to comply with code requirements.
- Use GFCI outlets to prevent electrical shocks near the sink area.
Step 5: Installing the Sink and Dishwasher
After building the frame and roughing in the utilities, it’s time to install the sink and dishwasher.
- Sink Installation:
- Cut out the template and drop the sink in place.
- Use a bead of silicone caulk around the edges to create a watertight seal.
- Dishwasher Installation:
- Position the dishwasher close to the sink to minimize plumbing runs.
- Connect the drain and water supply lines, ensuring they’re secure and leak-free.
Step 6: Countertop Installation
Once the sink and dishwasher are in place, the next step is installing the countertop.
- Measure and Cut: Use a diamond blade saw for precise cuts on granite or quartz.
- Seam Placement: Place seams in less visible areas, away from the sink or seating zone.
Final Touches: Adding Hardware and Finishes
Now that the main components are in, it’s time to finish up with hardware and accessories.
- Install Drawer Pulls and Cabinet Knobs: Use a template to ensure consistent placement.
- Add Trim and Moldings: Consider decorative moldings to give your island a polished look.
Cost Breakdown for Building a Kitchen Island
Here’s a quick breakdown of the cost to give you an approximate idea:
| Item | Estimated Cost |
| Cabinetry | $1,000 – $3,000 |
| Countertop | $1,500 – $4,000 |
| Sink | $200 – $500 |
| Dishwasher | $400 – $1,200 |
| Plumbing and Electrical | $500 – $1,500 |
| Labor (if outsourced) | $1,500 – $3,000 |
| Total Estimated Cost | $5,100 – $13,200 |
FAQs
How much space is needed for a kitchen island with a sink and dishwasher?
To comfortably fit both a sink and a dishwasher, you should plan for an island that’s at least 5 feet long and 2 feet wide. Ensure there’s enough clearance around the island—at least 42 inches—for easy movement.
Can a dishwasher be installed in any kitchen island?
Yes, but it’s essential to plan for proper plumbing and electrical connections. Make sure to position the dishwasher near a water source and drain line to avoid complicated plumbing runs.
What is the best countertop material for a kitchen island with a sink?
Quartz is highly recommended due to its non-porous nature, which makes it resistant to stains and moisture. Granite is another popular choice but requires periodic sealing.
How much does it cost to build a kitchen island from scratch?
The cost can vary greatly based on materials and design, ranging from $5,100 to $13,200, depending on the size, choice of appliances, and whether you hire a professional.
Do I need a permit to add plumbing and electrical outlets to a kitchen island?
Yes, in most areas, any new plumbing or electrical work requires permits. Check with your local building department to ensure compliance.